VIDEO NOTES & ACTIVITIES
Objectives:
1.00: Understand project requirements for video projects
2.00: Understand digital video
3.00: Understand the Adobe Premiere Pro CC interface
4.00: Apply procedures for editing Digital Video using Adobe Premiere Pro CC
5.00: Apply procedures for exporting video with Adobe Premiere Pro CC
1.00: Understand project requirements for video projects
2.00: Understand digital video
3.00: Understand the Adobe Premiere Pro CC interface
4.00: Apply procedures for editing Digital Video using Adobe Premiere Pro CC
5.00: Apply procedures for exporting video with Adobe Premiere Pro CC
Getting Started in Video Design
|
In order to start strong in Adobe Visual Design, it is important to understand the Stage of Production, so let's start by reviewing the Getting Started in Video and then completing the Phases of Production Worksheet for homework!
|
| ||||
Working in the Industry
|
Start by reviewing the Jobs in Industry Notes that you can download to the right. Then you will work with your group to create a Presentation about the different categories of Jobs in the video industry:
Working in Industry Activity
We will present these when everyone is finished! |
| ||||||||
Movie Genres
|
We will start by reviewing the Move Genres PowerPoint Notes
Then download the 100 Movies Scavenger Hunt. Try to identify movies you've already seen! Otherwise, use Google to help you discover more about that genre! Happy Hunting!
|
| ||||
History of Film
|
Using the History of Film PowerPoint Notes, you are going to make a timeline of the events that helped shaped modern Motion Pictures.
I think using Adobe Spark's free custom timeline builder . is the way to go, but feel free to use Canva, PowerPoint, etc... When you have finished, please save your timeline as last name + first name + period + timeline as a PDF or PNG file and turn it in.
|
| ||
Project Management
|
As this is a HIGHLY group project based course, so we need to ensure that we have a common idea and language around working on a project and working as a team. Start by reviewing the AViD 1.03 Project Management.pptx.
Then you will need to complete the homework
|
| ||
Understanding Copyright: Collaborative Research
You have been assigned a group number. Let's start by looking over the assignment linked below. Take a look at the questions for your group number and make a document that shows your research to your questions. This will be an individual research job first.
Once everyone has completed this assignment we will practice a key project management method called validation. This means if information created by multiple different sources matches, it is likely "correct" and will be accepted as fact. We will move into our groups of four to five and discuss the questions and terminology you researched. Make sure to check for credible sources. Once your group has determined the correct definitions and examples we will move into creating one unified document with validated information, that will become the "textbook" for learning Copyright in this class.
Your group will use the provided template in PowerPoint to fill in the a presentation about Copyright. Each slide is already titled and has instructions or questions that you need to answer. You can delete the instructions once you have included the required information. If your group wishes to format the appearance of your slides, you may, but only as long as you have time. What matters is the content you add. Please change the group numbered slide to include your group members names.
Your group will present your portion of the presentation in class.
Copyright is important to understand what protects our creations and are key questions on your certification exam at the end of the semester.
| copyright_classroom_research_activity.pptx |
Pre-Production
Pre-Production: Storyboard
|
Let's start by discussing what the stages of Production are, what storyboards and shot lists are! Let's review the notes below: AViD Pre Production Storyboards Shot List PowerPoint NotesDownload AViD Pre Production Storyboards Shot List PowerPoint Notes As we take a more in depth look at what Storyboards are and how to create them, we will be watching this intro to storyboarding video to prepare you for today's lesson. This will be important and helpful when you start creating your own storyboards! |
|
Storyboards a Scene Activity
Today you are going to be doing a quick storyboard, pick your Pick your favorite scene from a movie, tv show, or book. And recreate that scene how you think it would have been drawn out by the creators. Add in motion indicators (arrows) if there is movement from an actor or the camera, add in dialogue if people were speaking, time each shot. You will be creating storyboards for all of your video projects this semester, so this is an important planning tool to learn and use. For your storyboards, you must include at least 10 panels, and the link to the video.
You can either do your storyboards on paper or digitally:
Digital: Create account at MakeStoryboard.com or at boords.com. These are free sites to help us create storyboards virtually.
Paper: I will provide copies, but it is linked here as well Storyboard Template (linked here as well)
Helpful Resources:
Below is a great Storyboard Cheat Sheet that will help you visualize how storyboards should look! Use this Storyboard with Directions Guide to help you!
|
|
| ||||||
Shoot Scouting List
|
Use the scene from Breakfast Club that we watched in class and linked here, you and your partner will need to analyze the 1:48 minute clip to come up with all the different locations and the scenes that would need to be filmed to recreate this scene.
Start by figuring out how many different locations you will need to film this scene yourself. Pay close attention to locations that can be used multiple times and elements that MUST be included in the location in order to make that shot work (i.e. a staircase). This can be written as a list. You will be scouting locations here at school based on the list of locations you and your partner determined you need. You will have to take pictures of each location based on the worksheet criteria on your Shoot Location Scouting worksheet. You will need to describe the locations you found, answer the questions, and take pictures of the location with the angles and shots you plan to use and explain your reasons. This activity will be done with a Partner to scout, but the worksheet explanations needs to be done on your own! |
| ||
Pre-Production: Script
|
One of the key elements to creating a video project is writing a script, the storyboards we just learned about are based on the script! We will explore what scripts are but also how to format and write them. There are very strict rules to writing a script. We will be practicing this as well!
In the PowerPoint, this image was included, take a look at it more closely, you will be using this as a reference to help you as you practice writing your own scripts. 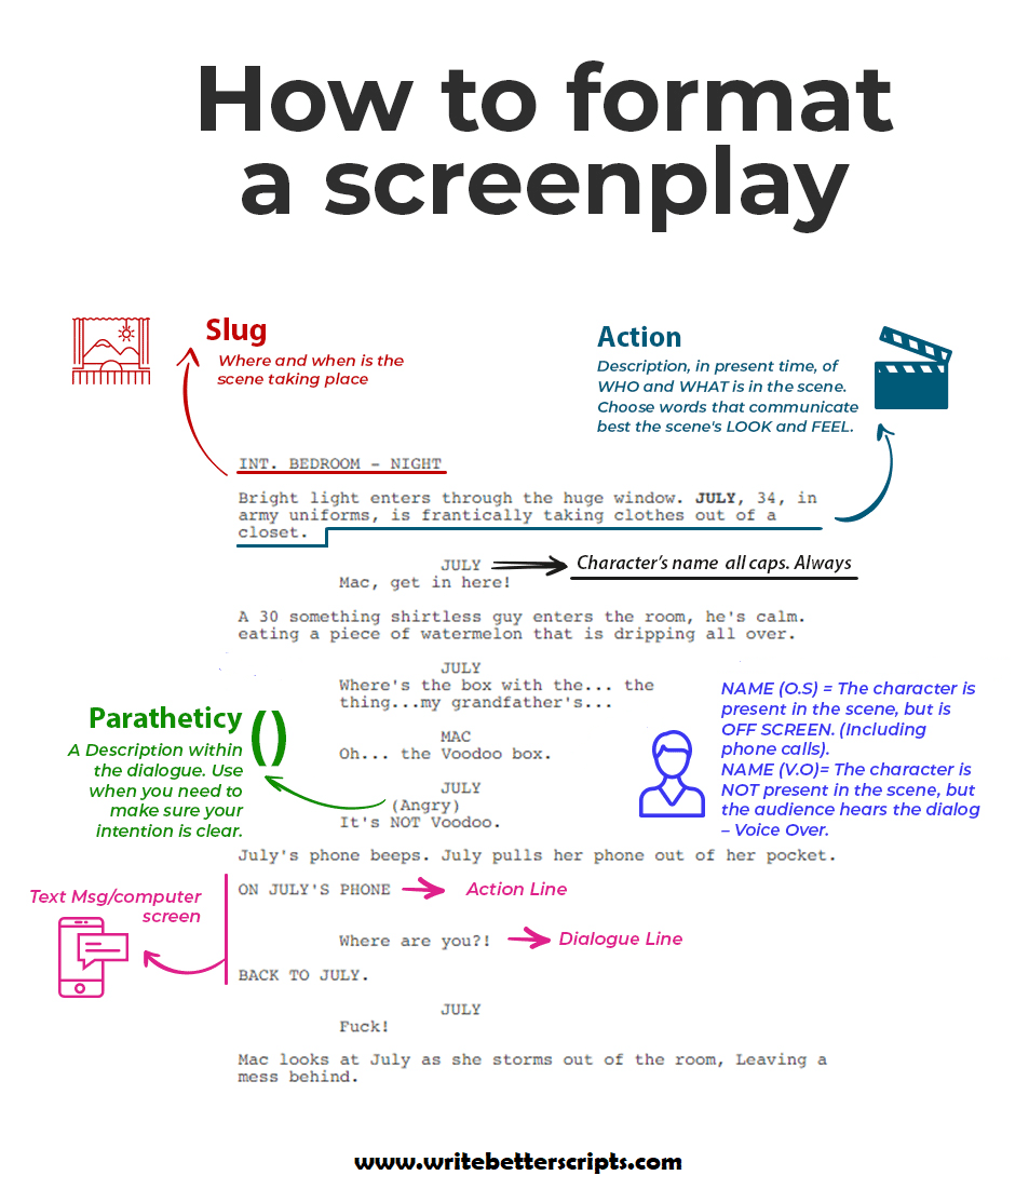
|
| ||
Cartoon Script Writing
|
Now that we have reviewed the Pre-Production Scripts PowerPoint Notes , use the info you learned about scriptwriting to help you create a fun script to go with one of the cartoons from the presentation. Make sure you add the image to your scrip at the top, you can right click on the cartoon image you want to use and save the image to your computer! Download the template below to help you!
Your script MUST be a FULL page. When you have finished, save your file at last name +first name + period + cartoon script and turn in. Your script must include:
|
| ||||
Reading a Script
|
Using the Internet Movie Script Database (IMSDb.com), you will choose a script to review (it will be long so you do not need to read the whole thing). Your script MUST be PG13 or lower to be used. If you select a rated R film, it will not be graded. Then download and complete the Reading a Script worksheet about your chosen script. Please use complete sentences please and ensure that you are being clear with your answers.
When you're finished, turn in your assignment as Last name + First name + Period + Script review |
| ||
Pre-Production: Moving the Camera
|
As we are getting ready to start making our own videos, we have to ensure that we know all of the different ways to move the camera. Let' start by reviewing the Camera Angles, Shots, and Framing PowerPoint Notes linked below.
Next we will watch Rules of Composition YouTube video and reviewed the Framing PowerPoint notes linked below. This will help you with your next assignment!
|
| ||||
|
Camera Shots, Angles, and Framing Images
Now that we have reviewed the Notes above and watched Rules of Composition, you will use Google Images to search the internet for examples of shots listed in the Shots and Angles matrix worksheet Download Shots and Angles matrix worksheet! Please only used school appropriate images. |
| ||
Camera Movements of a Scene
|
Now that we have reviewed Camera Movements, you can review the Analyze Camera Movement PowerPoint that you can , download the Analyze Camera Movement activity and go to YouTube (or on a streaming service, check with me 1st!) and find a video clip to watch (that is school appropriate). While watching (pause as you need to to write) make note of 5 DIFFERENT Camera Movements and explain the following:
Type of movement: When it occurs in the video (period of minutes/seconds): What impact does that movement have on the scene and story: <------You MUST write at least 2 sentences to get full credit!
|
| ||||
Film Study: The Princess Bride
|
Before you can write your own script, it's good to explore amazing scripts and films that have come before. We are going to be watching the Princess bride in completing the film study while we watch it. Please pay attention to the use of dialogue, camera movement, action, and more as we explore this amazing film.
|
| ||
5 Minute Script Project
|
You will FIRST complete the 5-Minute Script worksheet you can download to the right. This is to start building your movie concept BEFORE you start working with your group! This is going to start leading us into our first group project! Once completed, start working on your full script and storyboard. Each team member will write their OWN 5 minute script in order to have several to work from for the next step! Throughout this project, your group will create a project plan (template provided to the right), script, storyboard, pitch, shot list, and promo poster for a 5-minute movie. I want you to be as creative as you'd like, however, you must have your idea for the mini movie approved. As a team review this link to how to Develop a Story. Theme will be: Good vs. Evil Your group will start by completing the project plan worksheet and will use 5-minute script checklist to ensure you have included everything. You will then use the 5-minute script to develop a full script and storyboard. From there, you will create a promo poster and pitch for your 5-minute movie. Last you will need a shot list based on your storyboards. The Script: Use the 5-Minute Script worksheet we did 1st along with the resources below to develop a full 5-minute script. I have included a sample scene and a link to Celtx, a free online scriptwriting service. You will need to include the following in your script.
Use this Scriptwriting Elements and Formatting basics Download Scriptwriting Elements and Formatting basicsto help remember the way your script should be written! Shot Requirements: These may be shot in any sequence the story requires, but ALL must be included. These must be included in both your script and your storyboards
The Storyboards: Once you have written your script, you and your group will be creating Storyboards for ALL scenes of your script. You do not need to be an artist, just make sure it is clearly understandable. You need to label each board so a viewer can easily match it to your script. You will take your script and create a visual representation of each scene in your script. Think of this like creating a comic book, just without the dialogue (that is what the script is for). You will have a block for each take or camera angle change. Click here for the storyboard template worksheet. Download Click here for the storyboard template worksheet.You will need to include the following:
Shot List: For your project you must also create a Shot List so each day you and your team will know what you need to film. Be REASONABLE about what you can accomplish in 1 hour a day of filming only. Use the How to make a Shot List article linked here to help guide you and download a copy of the shot list template here to use. The Promo Poster: Your poster must be a concept of what your movie's poster would look like. Make sure it is a Portrait orientation and at least a letter size. Your poster must include the title of the movie, a tag line, cast information, and release date. For your 5-Minute Movie, you will create a promotional poster, much like those you see at theaters. Make sure your messaging stays true to your audience choice. You can use Canva, Illustrator, Photoshop, Gravit Designer, etc.,,. (Really you can use anything you choose to make the poster, as long as it looks professional) This will be the only visual element you make, other than the storyboard, so be creative, and have fun! The Pitch: The pitch must be a PowerPoint/Google Slides presentation and 7-12 slides long. It should include:
If I have issues with your group not following these directions, you risk loosing points from your final grade. Keep in mind, this is the first major project of the semester! |
| ||||||||||||||
Production: The Hardware
|
Successful in a video production, you have to understand the materials and equipment that you'll be working with. The two presentations below will go through the camera hardware, DSLR cameras, lights, cables and microphones.
This will help you when you complete your homework.
|
| ||||||
Cuts and Transitions
|
In order to create dynamic movies, you need to know more about Cuts and Transitions!
Start by reviewing the notes and then complete the Cuts and Transitions vocab assignment putting the terms in your own words!
|
| ||||
Film Study: Star Wars A New Hope
|
When working with effects, its a good idea to see where we started. Star Wars was one of the first films to utilize special effects, but it also used sound to enhance the story.
We are going to be watching the A New Hope and complete the film study while we watch it. Please pay attention to the use of dialogue, camera movement, action, and more as we explore this amazing film. |
| ||
