VIDEO PROJECTS
Camera Shot, Angles, and Movement Example Video
Now that we have reviewed the Cameras Movements, Shots, and Angles it is time to try these yourself. With a partner, you will take a quick 5-8 second video example to demonstrate you can effectively create these different shots. Using a video camera or phone, demonstrate the techniques listed below in a quick video. Describe the technique as you are filming. Example: “I am taking a long shot and zooming in on the bulldog by the flagpole.”
Once you have captured all of you footage you will need to import your footage to the computer to edit together in 1 video. We will be using iMovie today to get started with basic editing.
For your Video you need:
add a Text slide naming it before the shot with the number on the list put a lower third text in on top of the shot
Make sure your video is edited to usable video and the frame size fills the screen
Add a transition between each shot
Add a Title slide at the start with you and your partner's names on it
Please make sure your shots are in the order of the list below
Read the article below about creating a shot list and camera practice assignment attached. You will likely have to use your phones to complete this assignment, but have fun with it!!
Shots List:
- Zoom In/Zoom Out
- Dolly Shot
- Dolly Zoom
- Pan Left/Pan Right
- Tilt Up/Tilt Down
- Crane Shot
- Truck Shot
- Establishing Shot
- Low Angle
- High Angle
- Canted Angle
- Aerial Shot
- Eye-Level Angle
- Ground Level Angle
- Point of View Shot
- Over the Shoulder Shot
- Two Shot
- Extreme Close Up
- Close Up
- Medium Close Up
- Medium Shot
- Cowboy Shot
- Long Shot
- Wide Shot
- Extreme Long Shot
Premier Pro Boot Camp
Together we will be starting the Premier Pro Bootcamp! This is divided into 3 different parts that we will do in order!
This is going to kick start our editing using Adobe Premier Pro, this will be ESSENTIAL to pass the Certification exam! You will turn these in when you have finished. We will also use these to help study for the Premier Pro Credential later on!
This is going to kick start our editing using Adobe Premier Pro, this will be ESSENTIAL to pass the Certification exam! You will turn these in when you have finished. We will also use these to help study for the Premier Pro Credential later on!
|
Notes:
|
Assignments:
| ||||
|
| ||||||||
HelpX Homework
|
Complete the HelpX : Learn Editing Skills. Make sure you answer all the questions and turn in here when you have finished!
Complete the HelpX: Share your Created Movie. Make sure you answer all the questions and turn in here when you have finished! Complete the HelpX: Add Effects. This set of tutorials will help you work on how to add effects to videos, this will help you as you move to our next unit project, please download the HelpX: Add Effects of your homework and turn in when you have finished! Complete the HelpX: Work with Graphics and Titles. Make sure you answer all the questions and turn in here when you have finished! These lesson will help you with the certification test! |
| ||||||||
Production: B-Roll Challenge
|
B-Roll: The Secret Sauce of Any Great Video
Not all videos are created equal. Some are engaging and interesting. Others…not so much. What is the secret sauce to making a great video... A lot of elements can certainly contribute, such as: good sound, short & sweet length, and a tight script. Yet there is one important element that is often overlooked and I believe is essential to the really great videos. It’s B-roll. Sometimes called B Roll, Broll, b-roll footage, coverage, or simply “extra shots,” b-roll is the supplemental or alternative video footage that adds visual interest and context to a video. Incorporating b-roll into your video increases the production value and gives it that professional polish. Lets explore about the difference between A Roll and B Roll by reviewing the AViD A Roll and B Roll PowerPoint Notes. B-Roll Challenge This will be the first project that we are going to film and also place on our portfolio website. Watch “THE B ROLL CHALLENGE” video first! and then watch 5 B Roll Mistakes to Avoid! Filming Challenge: Your challenge is to create a short video that illustrates a variety of creative B-roll video footage, based on the locations available to you. Working alone today, set a timer on your device for 30 minutes and then move from location to location taking turns shooting footage with one or more cameras. Find a location that is uninteresting and use the different shot types, angles, and levels we have discussed in class to grab B-Roll shots that you are going to use to edit together your first project. You will need to chose a theme for your B Roll footage...you can use the classroom or an object. Movements you MUST include in your shots:
To add music: https://yt2mp3.info/?l=en You need to have a minimum of 90 seconds in your final B Roll reel. You will edit the footage together and include an opening title with the name of your roll and your name, You must also include music and remove the background noise of your footage. When you have finished, you will go to File > Export > Export Media and save it as a H264 file. Some tips to consider:
Use the rubric and Checklist linked here Download linked hereto guide you in this project! Once you have edited your video together, you will need to export it and turn it in! |
| ||||
Cuts and Transition Example Video
Now that we have reviewed the Cuts and Transitions, it is time to try these yourself. With a partner, you EACH will take a quick videos example to demonstrate you can effectively create these different cuts. BUT you will EACH edit your own videos and turn in SEPARATE FINAL PRODUCTS!!!
Once you have captured all of you footage you will need to import your footage to the computer to edit together in 1 video.
For your Video you need:
add a Title slide naming it before the shot with the number on the list
Title Slides need to be more dynamic and engaging this time
Make sure your video is edited to usable video and the frame size fills the screen
Use each transitions at least once and include that on the title slide before the transition
add a Title slide at the start with your name included
Please make sure your Cuts/Transitions are in the order of the list below
Include music instead of the original sound: Royalty Free Music.
Cuts:
Transitions:
Once you have edited your video together, you will need to export it and turn it in to the Cuts & Transitions Shared Drive FolderLinks to an external site., then right click and go to Get Link and copy the link and submit the URL for you video here!
Once you have captured all of you footage you will need to import your footage to the computer to edit together in 1 video.
For your Video you need:
add a Title slide naming it before the shot with the number on the list
Title Slides need to be more dynamic and engaging this time
Make sure your video is edited to usable video and the frame size fills the screen
Use each transitions at least once and include that on the title slide before the transition
add a Title slide at the start with your name included
Please make sure your Cuts/Transitions are in the order of the list below
Include music instead of the original sound: Royalty Free Music.
Cuts:
- Standard Cut
- Jump Cut
- Cutaway
- J-Cuts
- L-Cuts
- Cutting on Action
- Match Cuts
- Montage
Transitions:
- Fade Up and Down
- Dissolve
- Wipe
Once you have edited your video together, you will need to export it and turn it in to the Cuts & Transitions Shared Drive FolderLinks to an external site., then right click and go to Get Link and copy the link and submit the URL for you video here!
Special Effects Editing
|
This is a multi-step practice edit to help you learn about color correcting & grading, how to use specific effects that you will see on your certification exam, and also learn how to use the Effects Control Panel.
Attached are the two lesson PowerPoints we will go over and the step by step instructions on how to work through the Practice Edit using the Effects Tasks.
You will turn in a video file that includes all the sequences by nesting each effect's sequence. The practice edit files can in the Google Drive linked above. Download the files you need! You will need to go to this Effects Tasks Walkthrough Document found on the right to use to complete the assigned tasks below:
Ken Burns: Create a well produced “Ken Burns” style video, that incorporates changes in size and location of your still images. Your photo collection must tell a story. A project with an emotional theme works well, so chose your topic wisely. The classic example is the Sarah McGlaughlin, “Arms of an Angel” dog commercial (although some video is included). Other examples might include: wedding photos, vacation photos, family, a famous artist, a historical event, or a current event. Compiling a quality collection of photos is the foundation for a good project. Pay particular attention to the orientation of the images. If you are designing for mobile, portrait shots can work well, but they do not work well in the more traditional landscape mode (16:9 or 4:3 ratio). Click here for an example of a Ken Burns Video.
Once you have edited your first sequence together your project. When all the activities are finished, you will need to export all of your sequences separately using these directions and turn it in. |
| ||||||||||
Text Messaging Bubbles
|
For this assignment, you'll use the video given to you below or shoot your own video to create a short scene of someone texting with their friends. You will edit in Adobe PP and then export as a H.264 to submit.
You must include:
Video Tutorial: https://www.youtube.com/watch?v=TTP74aXQCLQ |
| ||||||||||
Titles & Graphics Practice: Donut Facts
|
DowNext let's learn how to make Text in Premiere Pro!
Read through AViD Titles in Premiere Pro.pptx presentation and also check out the tutorial on how to make text appear behind an object how to make text appear behind an object linked here to help you! Instructions: Use the Donut videos located the Google Drive folder linked here. You will need to download the entire folder. You will find a zipped folder in your Downloads. Unzip the folder and move it into a new Folder called Donuts in your folder. Create a new project and name it Last name_First Name_Title Practice Import the Donut Video Assets Make sure you review the AVidD Title Notes PowerPoint. and the Creating Titles Behind Object Notes PowerPointLinks to an external site. to help you! You are going to create 7 graphics. You can use as many video clips as you want to, your video can be a long or short as your would like in order to get all 7 graphics included in your video. You can bring in whatever type of audio you would like for your video. This is to help us learn how to use the Type Tool and the Graphics Workspace. 7 Graphics you MUST include:
Download the Title Tasks document for detailed directions to help you compete this project! Along with the Youtube videos linked here! When you have finished, you will export your final video and submit the the Text Effects Videos FolderLinks to an external site. . Donut Facts: Choose at least 5 facts to include in your video:
. |
| ||||||||||
Nightcrawler Smoke Effect
|
For this assignment, you'll make a short video (like the example shown) incorporating the time travel effect. You can use yourself or an object, but the video must be at least 30-45 seconds long and use this effect twice. You must also include at least 2 audio tracks, 1 being the sound effect given to you. To save the files below, right click and choose save as. Remember to mount your camera or set up your phone so it doesn't move when filming!
When you have finished capturing your footage, you will edit in Adobe PP and then export as a H.264 file When you have finished, you will export your final video and turn it in. |
|
|
|
|
| ||||||||
Commercials or PSA Activities
|
In order to make your own commercial or public service announcement you must understand what they are and the types available. Let's start with reviewing the Commercials and PSA PowerPoint notes found to the right.
Now that we have the Commercials and PSA PowerPoint notes, you will fill in the attached activity on your own. This lesson is to help prepare you to create your own Commercial! Make sure you save your completed Google Slide as last name + first name + period +commercials and turn in! Next, using the worksheet Commercial and PSA Video Critique worksheet, go to YouTube and find 2 commercials and 2 PSAs to watch and critique using the questions on the worksheet. Make sure they are at least 30 seconds or more. Answer in COMPLETE sentences, yes and no are NOT acceptable answers! When you have finished, you will turn it in! |
| ||||||
Commercials or PSA ProjectsYou and your group will be creating a 60 second video for commercial or a Public Service Announcement.
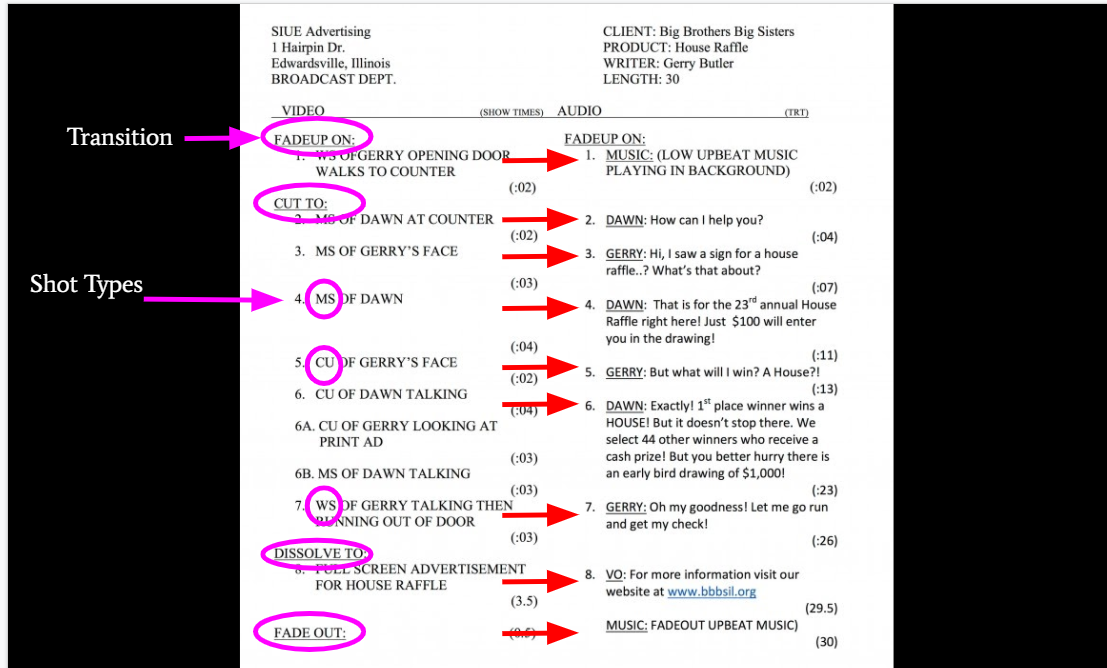
After choosing your fake product or a real cause and get it approved by Scales, you will work through pre-production to write a script, create a storyboard, identify what camera angles and movements will be used (added on storyboard), create a shot list, determine what audio tracks or sounds will be used (sound effects, voiceover, music), and identify any graphics and text that will be used. You will need to create a Logo and Slogan for your fake product. USe the Project Guide available to the right along with the Commercial Script example to help you! Links to an external site. For this project, you must include 2 of following:
Once finished shooting the video, you will import the video into Adobe Premiere Pro and edit your video. You will add titles, transitions and effects to your video, including credits. When you are finished, you will turn in:
Task: You will work in small groups to plan, prepare, write and present a TV commercial. 1 days of planning, 2 day of filming, 2 days of editing Process:
Use The Tips Below When Planning Planning Your Commercial:
Preparing the Script and Storyboard:
Reviewing:
|
| ||||||||||
Telling a Story...
News and Interview Skills
|
One of the largest markets for video production is the News. To be an effective on air personality, you have to master how to conduct interviews. Let's review the News and Interview PowerPoint Presentation so you will be prepared for our assignments.
Now that we have learned about interviews, let's work on effective questions, download the Interviewing and Effective Questions homework to work on how you write questions. Using the Interview Techniques to help you and what we learn in the lessons before, you will conduct a 5 min interview of your partner. I want to see good look room, head room, and interesting answers to your questions that tell me what the question is without using the voice of the interviewer (what we would use to edit). You will be filming your interviews. Make sure you are framing your subject and keeping yourself out of the shot.
|
| ||||||
A News Story Project
|
A News Story with J Cuts, L Cuts, and Chroma Key
Putting together a newscast is a process that requires a great deal of teamwork, planning, and execution. Creating a newscast that is informative, compelling, and engaging is one of journalism’s greatest challenges. In order to have success, each individual item must be done well, but all of the components must come to together and be presented in an interesting way. You will be creating 2 minutes news story. Directions: Students will work individually to create a news story, demonstrating the techniques of narrating in the Audio Mixer, Using J and L Cuts, and Using the Green Screen. Suggested sequence: Opening (Who, what, where, when, why, how), J Cut into stock footage, cut to interview with two or more separate individuals, cut back to stock footage with narration, L Cut into closing statement, sign off. Pre-production:
Your project should be in this order:
Resources: |
| ||
Documentaries
|
To ensure that we know how to create a documentary, we need to understand what makes a documentary a documentary. Let's start by reviewing the AViD Documentar notes, some of the information on Cuts will be a good review!
|
| ||
Film Study: 20 Feet from Stardom
|
To better understand Documentaries, we need to watch them. In class we will watch 20 Feet From Stardom. This film explores the life and perspective of the back up singers in the 1950s through today. You will be completing the 20 Feet from Stardom Film Study as we watch the movie. We will discuss the film when we have finished and you will have time to complete the assignment. When you have finished, please turn in here.
|
| ||
60 Second Documentary Project
Summary:
For this project you will work in a group to create a short movie in the genre you choose. The genre project is designed to be your 2nd major project for which you will create a story and shoot your own video. Take a look at the Movie Genre presentation and think about the elements that make up your favorite genre. You need to put time into creating a solid storyboard and perhaps more importantly, a shot list that will allow you to use a wide range of shots to create a sequence that is of visual interest.
Remember to include continuity throughout your short movie. Your movie should be between 1 to 2 mins long, it can be longer if you would like. I have planned 3 full days of shooting video and 2 days to edit. If you use your storyboard and shot list to help you efficiently film and edit, you will be able to complete your project in the timeframe given.
Creating a sequence that effectively incorporates a wide variety of shot types to create a compelling story is at the core of this project. The project will demonstrate your ability to import clips, preview and edit clips in the Source Monitor, create a sequence on the Timeline, edit audio/video on the Timeline, use the Effect Controls panel, think about different cut types, add transitions, and export.
Directions:
This will be a combination of thinking about continuity and matching action. This project can also include elements similar to your Broll Project. This video will be 1 to 2 minutes in length or longer. You will create a storyboard and provide a brief description of your event before you are approved for filming. You will split up the roles to help work effectively as a team.
Export settings: Format H.264, Preset Youtube 720p
EXTRA PROJECTS
Montage Project
|
You will choose a topic to use to create a 1-2 minute montage video. You will find quality still images and/or clip art, as well as music and quotes/text about your topic. You MUST use a minimum of three royalty free songs and fade the volume in and out accordingly. You must use titles for the beginning and end of the video and text overlays during the video. You must include appropriate transitions between the image in your video. You must include time-mapped movement of images in your video.
After you have finished your project, save it as a Premiere Pro Project file titled Last Name + First Name + Period # + Montage. Export the file as a .AVI Movie (ex: smithjohn4montage.avi) and turn in. |
| ||
PSA Pre-Production Project

You have been tasked with creating your own 30-60 second Public Service Announcement. You will start the project by creating an outline or summary of the PSA on a topic of your choosing and pitch the idea to Mr. Mitchell pending his approval.
Once your outline has been approved, you will then create a storyboard for your PSA including camera angles, camera shots, sounds used and any graphics or text used for each scene. You will then create a script for your PSA including the purpose of your PSA, any facts or figures related to your topic, a call to action, and any websites or phone numbers for viewers to do more research on your topic. We will return to this project in a later unit to finish the production and post-production phases. |
| ||||||
PSA Project Continued
|
Based on the planning documents you created in your earlier project, you will shoot and put together a 30-60 Public Service Announcement. Once finished shooting the video, you will import the video into Adobe Premiere Pro and edit your video together. You will add titles, transitions and effects to your video. When the project is complete you will name the project with each group members last name + Period # + PSA and export a .AVI file to be turned in.
|
| ||
Commercial Project
You and your group will be tasked with choosing a topic to create a 60 second commercial. After choosing your topic, you will work through Pre-production including creating a storyboard identifying what camera angles and movements will be used, any sounds that will be used (sound effects, voiceover, music), and any graphics and text that will be used. You will also create a full script with all of the information for the cast and crew. Then your group will shoot and edit the video together. When the project is complete, you will name the project with each group members last name + Period # + Commercial and export a .AVI file to be turned in.
Green Screen Player Intros
|
You are working for the DC United Soccer Club in their video and graphics department. You have been given some green screen video of players to create some player introduction clips for the upcoming season. You will also be given a DC United logo and a background video to put the green screen video over. You will make a clip taking the 3 players, keying them over the background video, and create a title for each of the players giving their name, number and position. You will also add any necessary transitions at your discretion. When the project is complete, you will name project Last Name + First Name + Period # + GreenScreenPlayer and export a .AVI file to be turned in.
|
Player Information (in order)
| ||
LOTR Re-Edit
|
You have been given some raw footage from the original filming of the Lord of the Rings movie. Along with the script and soundtrack, you will follow the script and re-edit using sound design, cutaways and audio dubbing a final re-edit of the movie scene provided.
When the project is complete, you will name project Last Name + First Name + Period # +LOTRReedit and export a .AVI file to be turned in. |
| ||
Green Screen Breaking News
You will script, shoot and edit a breaking news event using an anchor desk shot and a green screen shot. You will have at least one anchor, tossing to a reporter in front of the green screen. You will find videos online to serve as the background of your green screen shot. The reporter and anchor will go back and forth asking and answering questions about the scene going on behind the reporter. You will edit the scenes together using Adobe Premiere Pro with different shot types, music and graphic titles for your news crew.
When the project is complete, you will name project Last Name + First Name + Period # + BreakingNews and export a .AVI file to be turned in.
When the project is complete, you will name project Last Name + First Name + Period # + BreakingNews and export a .AVI file to be turned in.
Anesthesia Script to Screen
|
You have been given some raw footage for a movie called Anesthesia. Along with the script and soundtrack, you will follow the script and edit using sound design, cutaways and audio dubbing a final edit of the movie scene provided.
When the project is complete, you will name project Last Name + First Name + Period # + Anesthesia and export a .AVI file to be turned in. |
| ||
Monster Movie
You have been tasked with creating a 3-5 minute monster movie. You will write a script and storyboard for your movie including locating sound effects and music. You will plan and shoot the movie and then collect all of your footage to edit the final product in Adobe Premiere Pro.
When the project is complete, you will name project Last Name + First Name + Period # + MonsterMovie and export a .AVI file to be turned in.
When the project is complete, you will name project Last Name + First Name + Period # + MonsterMovie and export a .AVI file to be turned in.
Whisper Fan Edit
|
You have been given some raw footage for a commercial for the new product called the Whisper Fan. You are given a treatment and a scripted voiceover. Using some the two documents you are given, you will edit together a quick commercial for the Whisper Fan. You will not use all of the shots provided in the folder. You will use the given voiceover, sound effects and graphics for the commercial.
When the project is complete, you will name the project Last Name + First Name + Period # + WhisperFan and export a .AVI file to be turned in. |
| ||||
A Perfect Day
You will be creating a video narrative that showcases a perfect day. You will write a script for any narration and create a storyboard based on the theme. Using the storyboard and script select the appropriate equipment to record your video. Remember to utilize different camera shots, camera movements, and camera angles when shooting the video. Select a copyright free music track of your own that will fit your theme. Edit your project according to the storyboard and add any titles or effects to enhance the project. Your final project should be between 3 and 5 minutes long.
When the project is complete, you will name project Last Name + First Name + Period # + PerfectDay and export a .AVI file to be turned in.
When the project is complete, you will name project Last Name + First Name + Period # + PerfectDay and export a .AVI file to be turned in.
